
I was invited to a couple baby related shindigs lately, and I figured it might be nice and special to try to make my friends' little ones something*. Clothes were my first thought, but bibs are way easier and can be used for a longer time. As I'm living now, you really cannot have too many bibs.
Materials Needed
- a bib to trace, or a downloaded pattern
- two bib-size pieces of fabric. I bought a little over a foot of cute printed cotton and then a yard of flannel that I planned on using for four bibs. I had quite a bit of fabric left over. Instead of flannel, you could also use chenille to make it really soft or terrycloth to make it really absorbent.
- fusible interfacing to give the thin cotton more structure. I bought the stuff for light to medium weight fabric.
- Velcro
- Pen, pencil, or marker
- iron and ironing board or surface
- and of course basics like scissors, sewing machine, and matching thread
1. Wash and dry the fabric.
2. If you’re using an existing bib for a pattern, place it on top of both the fabric you’re using for the front and the fabric for the back of your bib and trace around the existing bib, leaving some space around the entire thing (about a half inch) for seam allowance. Cut out your fabric pieces.

3. Place the bib on top of the fusible interfacing and trace around it. You don’t need to leave extra space this time. Cut out your interfacing.

4. Center the shiny side of the interfacing on the wrong side of the thin cotton fabric. There are directions on how to use the interfacing included when you buy it, but I’ll also describe the process here.
5. With your iron on the wool setting and the dull interfacing side of the fabric up, iron just around the edges so that the interfacing stays in place for the next step.

6. Lay a damp cloth (I just used extra fabric) over the bib and press the entire area of the bib with the iron until the cloth is dry. You’ll see steam coming off the cloth, and it should take a few minutes of ironing for the cloth to feel dry.

7. Let cool and then re-wet the cloth and repeat on the right side of the fabric with the interfacing facing down.

8. After it has cooled a couple minutes, match up the wrong sides of the front and back pieces of the bib and sew around the entire thing, leaving about an inch or so of space at the bottom un-sewn.

9. Flip the bib right side out through the opening. Another tutorial I glanced at recommended using a stick of sorts to help the fabric through the hole, but I didn’t find that I needed one in this case.

10. Press with the iron so that it lays flat--this time it can be set to cotton, or left on wool, doesn’t matter.

11. Topstitch (sew on the right side of the fabric close to the edge--I define this because I had to look it up myself not long ago) around the entire bib to close the opening and give it a finished look.


12. Cut a small piece of Velcro to use for the closure. Sew one piece of the Velcro on the back of one of the bib flaps and sew its counterpart on the front of the opposite bib flap. For sewing the Velcro, I sewed a box around the edge and then made an X in the middle.

And you’re done! Let me know if you have any questions or if something is unclear.

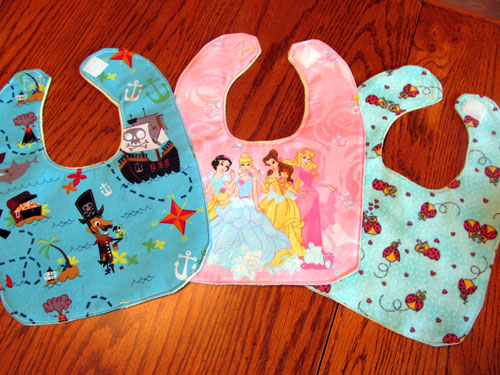
I believe it took me less than three hours to make these three bibs. The all flannel ladybug one went a lot faster because I skipped the interfacing step since I was working with slightly heavier fabric. I made these all for gifts, but now I’ll have to make Bridget one or five!
*So I scheduled this post ahead of time because I thought I would give my friend the bibs last night, but then I didn't see her. I figured this was going to show up in feeds even if I took it down, so I'm editing it instead. Sorry I ruined the surprise, friend! Now you know what's coming. PS: I thought of you during "Thinking of You" last night and reminisced to myself about our TOY video making days, hehe.
Love 'em! :)
ReplyDelete